- Self Help >
- Email Threat Protection>
- Quarantine [Hosted Exchange]
(Please note: Screenshots on How to access Self Help and Video Tutorials at the bottom of this article)
Quarantine
The Quarantine page lists messages that have been quarantined and should not be delivered to a user's mailbox. The messages are classified as spam or malware.
To view and search quarantined messages:
- On the Email Threat Protection page, click Quarantine.
- Click the Spam, Malware, Released, or Trash tab.
-
To view inbound messages, click the Received tab. To view outbound messages, click the Sent tab.
The Received and Sent tabs only appear if you subscribe to SmartHost Outbound Email Filtering service. SmartHost cleans internal emails before they exit a corporate network, reducing the risk of improper routing, noncompliant messaging, and misuse of company resources.
- Choose a From Date and To Date.
- To view messages with specific text in the From, To or Subject fields, type the text in the Search box.
- To only view messages that have been identified as sources of spam, select the Show Clutter (sources of known junk) check box. By default, messages that fail to meet certain weight or reputation standards are not shown in the Held Spam Report or Quarantine list.
- To use additional filters, click Advanced Search and enter filter criteria.
- Click Search.
Quarantine retention
Only domains in Closed Domain Mode with invalid addresses set to Delete will benefit from a 30-day quarantine retention period. Moving away from this Domain Mode in any fashion will result in a 14-day quarantine retention.
Show Internal Mail in Quarantine
Select the Show Internal Mail check box if you would like to view internal messages that have been identified as sources of spam.
Please note, this option is only available for Microsoft O365 customers in Closed mode with internal mail filtering enabled in the settings area.
View a Quarantined Message
To view a quarantined message:
-
In your emailed quarantined message report, click View next to the message.
You are redirected to Secure Cloud.
-
Sign in to Secure Cloud using your credentials.
Information about the message appears.
- Several options are available (listed below):
- Show/Hide Headers – Click this button to view/hide the supplemental data that is placed at the beginning of the block of data being transmitted in the message.
- Show Raw – Click this button to view messages in a Raw format (original source). A raw message includes the headers and the actual message.
- Display blocked content – Click this button to display a questionable image/link in the message.
- Show Allowed List & Tools – Click this button to expand the Allowed List and Tools sections. From here, you may download a message in a MBX or EML format. Only Direct customers will have access to the additional Email Threat Protection tools: Check RBL, Analyze Headers, and IP Whols.
- Delete – Click this button to delete this message.
- Release – Click this button to release this message.
- Back to quarantine – Click this button to go to the Email Quarantine page.
Release Quarantined Messages and Add Items to the Allowed List
If this feature has been enabled by the administrator, then the end user may release and allow their own message. Once this feature has been enabled, the end user will no longer submit allowed list requests to the administrator.
To release a message and optionally add to the allowed list:
- Select the check box for the individual message to release.
-
Click Release.
A Release Messages dialog box appears.
- If you want add the sender to your Allowed List, turn on the appropriate switch: From Address, Domain Address, or From IP Address.
- Click Confirm. Once the message has been released, it will appear in your released list.
Delete a Quarantined Message
To delete a quarantined message:
- From the appropriate tab (Spam, Malware, Released, or Trash), select the check box for the message to delete.
- Click Delete.
- In the confirmation dialog box, click Confirm.
If the message was deleted from the Spam, Malware, or Released list, it appears in the Trash. If the message was deleted from the Trash, it is permanently deleted.
Delete All Quarantined Messages
To delete all quarantined messages, or all quarantined messages from a search:
- Select the check box in the column header.
- Click Delete All.
- In the confirmation dialog box, click Confirm.
If messages were deleted from the Spam, Malware, or Released lists, they appear in the Trash. If messages were deleted from the Trash, they are permanently deleted.
Export Spam and Malware Quarantined Lists
To export a list of quarantined messages in .csv format:
-
On the Spam or Malware tab, click Export.
The Email Threat Protection > Statistics > Export Quarantine tab appears.
- Specify which messages you want to export, and then click Download.
==================================================
Quarantined Message Options
These options allow you to examine a message before releasing or deleting it.
Show/Hide Headers
This option allows you view/hide the supplemental data that is placed at the beginning of the block of data being transmitted in the message.
-
Click the Show Headers button to display the message headers.
- The header will appear at the top of the message. From here, you may scroll through the header information associated with the message.
OR
- Click the Hide Headers link to hide the message headers.
Show Raw Message
- Click the Show Raw button to view messages in a Raw format (original source). A raw message will contain the headers and the actual message.
- The Raw message will appear in a secondary Web browser window.
- Click the x in the Web browser tab to close the Raw message window and return to the Customer Portal.
Display Blocked Content
This option allows you to view/block a questionable image/link in the message.
- Click Display blocked content to display the questionable image/link in the message.
OR
-
Click Block images and links to block (hide) the questionable image/link in the message.
View/Use Allowed List & Tools
Simply click the Show Allowed List & Tools button, and then select the appropriate tool link. This option contains several Email Threat Protection Tools:
-
Download as .eml – This tool allows you to download and view the email message in an .eml e-mail file format. This format is typically used by Microsoft Outlook, Windows Mail, Mozilla Thunderbird, and other e-mail clients.
-
Download as .mbx – This tool allows you to download and view the email message in an .mbx e-mail file format. This format is typically used by Apple Mail, Eudora, KMail, and other MBOX clients.
-
Check RBL – This tool allows you to check your IP or domain address again DNS-based e-mail blocked lists. Some e-mail that you send may not be delivered. Simply click the Show Tools.
-
Analyze Headers – This tool analyzes e-mail headers and displays the routing information in a readable format. E-mail headers are present on every e-mail you receive via the Internet and can provide valuable diagnostic information.
-
IP Whois – This tool allows you to enter your domain and view associated Whois information.
Download a File into a EML or MBX Format
- Click the Show Allowed List & Tools button to expand this section.
- Click the Download as .eml or Download as .mbx button, respectively.
- A download link will appear at the bottom of your browser.
- Once the file has been downloaded, select the Open menu.
Delete Message
- Click the Delete button.
- An 'Are you sure' pop-up window will appear on your screen, prompting you for an answer.
- Click OK to delete the message.
OR
- Click Cancel to close this window and return to the Spam Quarantine page.
Release Message
- Click the Release button.
- A Success Released pop-up window will appear on your screen. (Note that the message should appear in the appropriate inbox shortly but it may not have today's date. The original sent date is preserved.)
- The page will refresh. The Allowed Lists & Tools section will expand.
- Select the appropriate Allowed List items, and then click the Add items to the domain allowed list button.
- The Allowed List & Tools section will refresh.
- Click the Back to Quarantine button to return to the Email Quarantine page.
Back to Quarantine
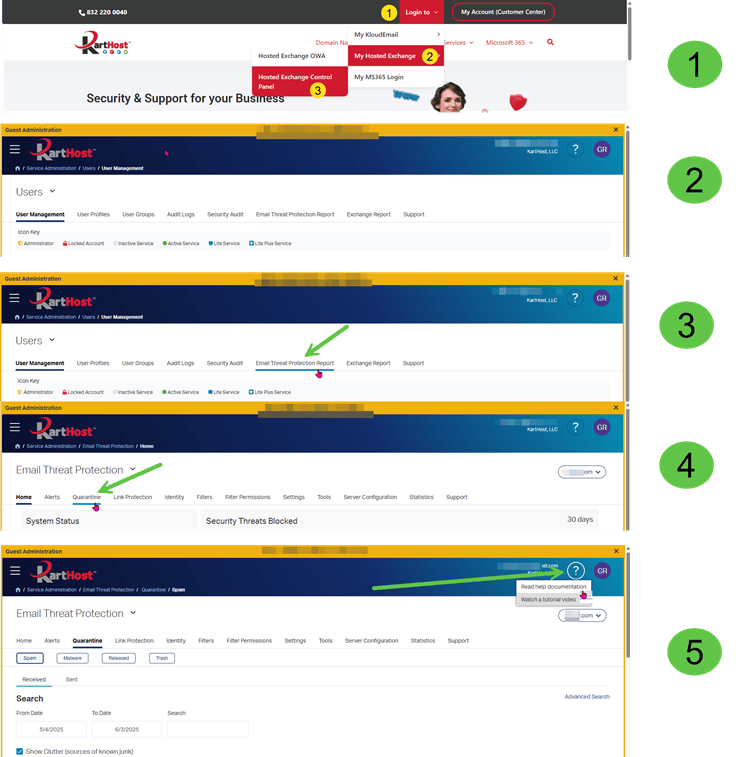
Here are screenshots on how to log into your account, access the Quarantine section, and find related videos. Each page in your Control Panel has its own Help documentation. All are located at the Question Mark at the top of the page.
1. Where to find your Hosted Exchange Control Panel Login page from KartHost.com
2. After logging in with your email address and email password, you will be taken to Users
3. Click on Email Threat Protection Report
4. Click on Quaratine
5. Click on the Question Mark (?) at top of page to go to either Documention (as listed above) or to Watch Tutorial Videos