You will learn to locate where in your GoDaddy account to find your domain name and where to change or add DNS Records. In this tutorial, it will focus only on adding new DNS Records.
These DNS Change instructions are not guaranteed (accurate as of 04/05/2024). Use at your own risk, as GoDaddy can change them at any time. If you have questions regarding GoDaddy DNS, please contact GoDaddy Support directly.
Prerequisite - Your Domain Name is registered at GoDaddy, and you must be logged into your GoDaddy account.
You must also have the DNS record info your service provider has instructed you to add.
Locating Your Domain Name
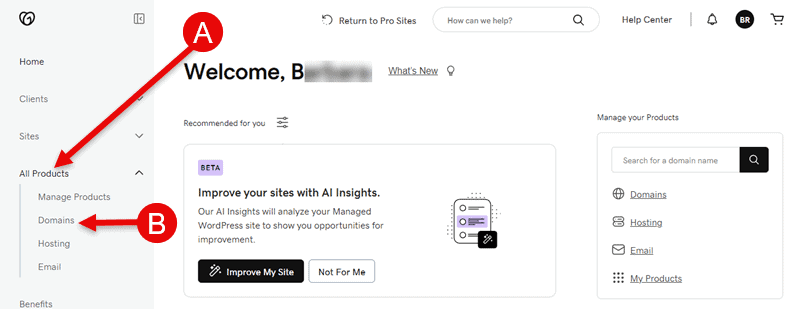
[Step 1] - Locate your Domain. In your GoDaddy account:
(A) locate All Products > Domains on the left navigation bar
(B) Click the Domains link.
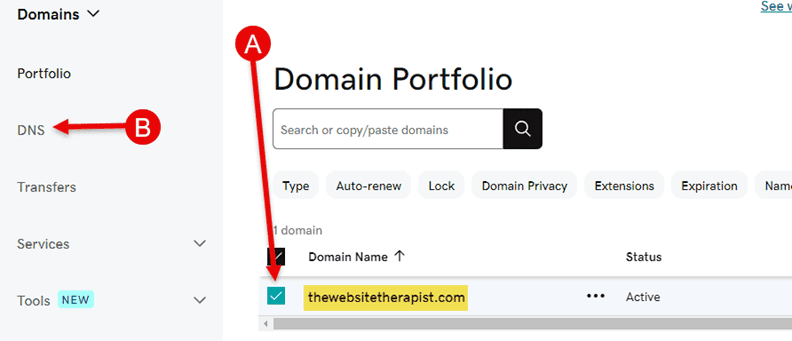
[Step 2] After locating your domain name so you can manage it's DNS
(A) Click the check box next to your domain name
(B) Click the DNS link on the left Navigation
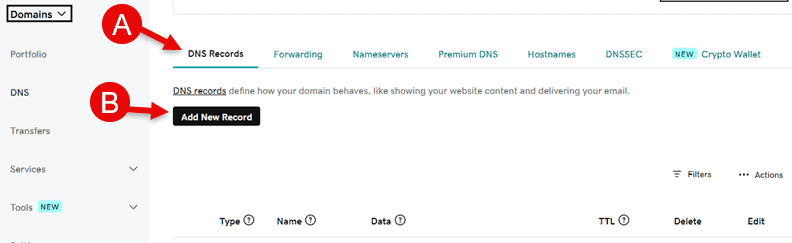
[Step 3]
(A) Click on the DNS Records tab
(B) Then click the 'Add New Record' button
To obtain the specific tutorial, click the link of the type of DNS record you wish to add:
Add TXT Record | Add CNAME Record | Add A Record | Add MX Record
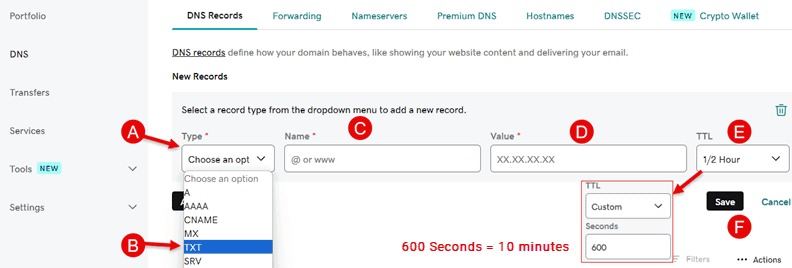
[Add TXT Record] Provides additional information about the domain.
(A) From the Type column drop-down
(B) select TXT
(C) Name column - Type "@" for the root domain name or type in a subdomain, like www., dev., etc.
(D) Value column - Type in the value of the Record, like SPF, DKIM, or DMARC records, etc.
(E) TTL (Total Time to Live) column - Any value you want or recommend 'Custom' and '600' in the Seconds field
(F) SAVE button - click to save your new record. Note: After saving, the record must propagate to the internet and can take a few minutes to over 24 hours. No one has control over this.
[Add CNAME Record] Can be used for many purposes.
(A) From the Type column drop-down select CNAME
(B) Name column - add the subdomain record, for example, www., dev., shop, etc.
(C) Value column - Value or points to. (For example, if you use www in the Name column, it would point to the root domain, so that value would be "mydomain.com" or anything else the CNAME needs to point to.
(D) SAVE button - click to save your new record. Note: After saving, the record must propagate to the internet and can take a few minutes to over 24 hours. No one has control over this.

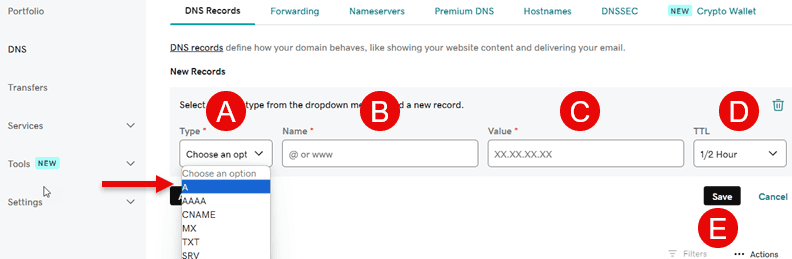
[Add 'A' Record] A records are usually used to point to a website or other type app on a server.
(A) From the Type column drop-down, select CNAME
(B) Name column - Type "@" for the root domain name or type in a subdomain, like www., dev., etc.
(C) Value column - Type the actual IP address the record will point to in the value field.
(D) TTL (Total Time to Live) column - Any value you want or recommend 'Custom' and '600' in the Seconds field
(E) SAVE button - click to save your new record. Note: After saving, the record must propagate to the internet and can take a few minutes to over 24 hours. No one has control over this.
[Add MX Record] MX records are used for receiving emails from other email services.
(A) From the Type column drop-down, select MX
(B) Name column - Add the "@" sign or type in the root domain like "mydomain.com"
(C) Priority column—Depending on the email service provider, there could be one or multiple records. If you have more than one record to add, just click the "Add another value" line below the Priority column. This will be a number to place in priority, like "0", "10", "20", etc.
(D) Value column - the server name will be placed here. Ask your email service provider for the server name for the MX record
(E) SAVE button - click to save your new record. Note: After saving, the record must propagate to the internet, which can take a few minutes to over 24 hours. No one has control over this.

Add TXT Record | Add CNAME Record | Add A Record | Add MX Record
End of Tutorial
Was this tutorial helpful to you? Please click the thumbs up below to encourage our staff to create more. Thank you!
Transfer your Domain Name today. Follow this helpful checklist, Domain Transfer Checklist, to get your email ready to Transfer your domain name from any Domain Register to KartHost.
Added April 6, 2024


