You can set up KloudEmail Basic, KloudEmail Suite (Both IMAP) and even KloudEmail Hosted Exchange with Windows 10 Mail. In this Tutorial, we will go over adding KloudEmail Basic and Suite. Please see Windows 10 Mail - Adding a KloudEmail Hosted Exchange Account as it is a little different.
KloudEmail Suite Important Note: Keep in mind KloudEmail Suite DOES provide Mobile Sync which is an Exchange Technology and that allows you to sync not only KloudEmail Webmail Email and Email Folders but also KloudEmail Webmail Contacts and Calendars with your Mobile Devices, like smartphones and tablets. With Windows 10 Mail you can ONLY Sync Email and Email Folders. You would need to upgrade to KloudEmail Exchange to be able to sync Email, Email Folders, Contacts and Calendars with ALL computers that have Outlook app, Windows 10 Mail and Mac Mail.
1) First, your computer MUST be using Windows 10 (Desktop or Laptop). And at the bottom left of your monitor type in "Mail" as shown below and from the results click on "Mail - Trusted Microsoft Store App" and click on it.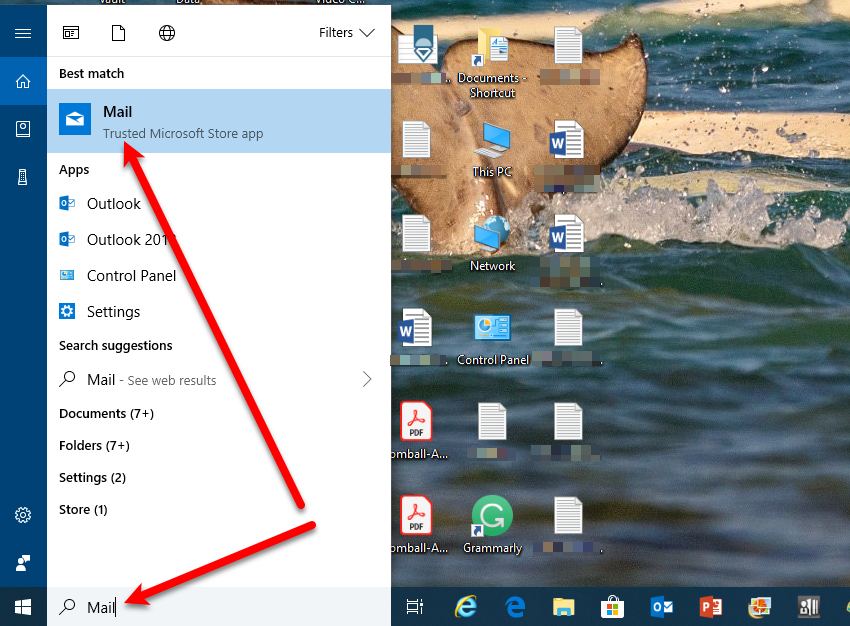
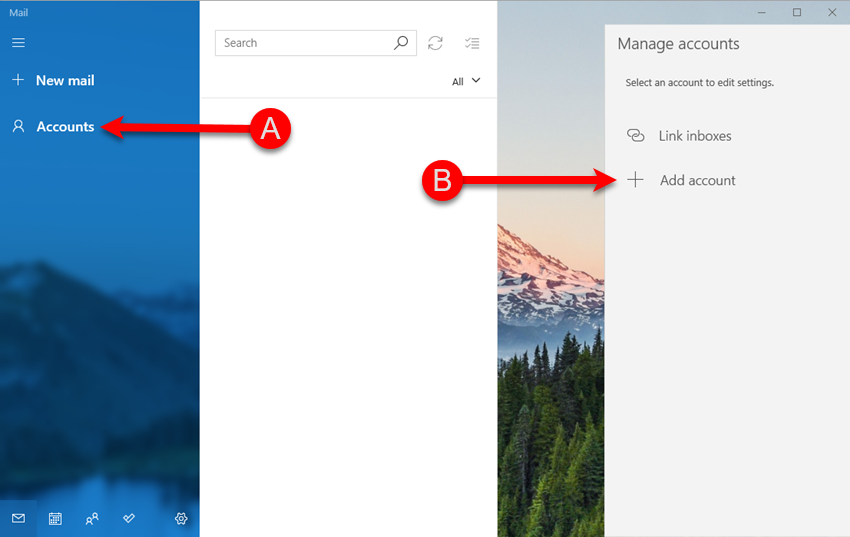
2) Once Mail opens A) Click Accounts and then B) '+ Add account'.
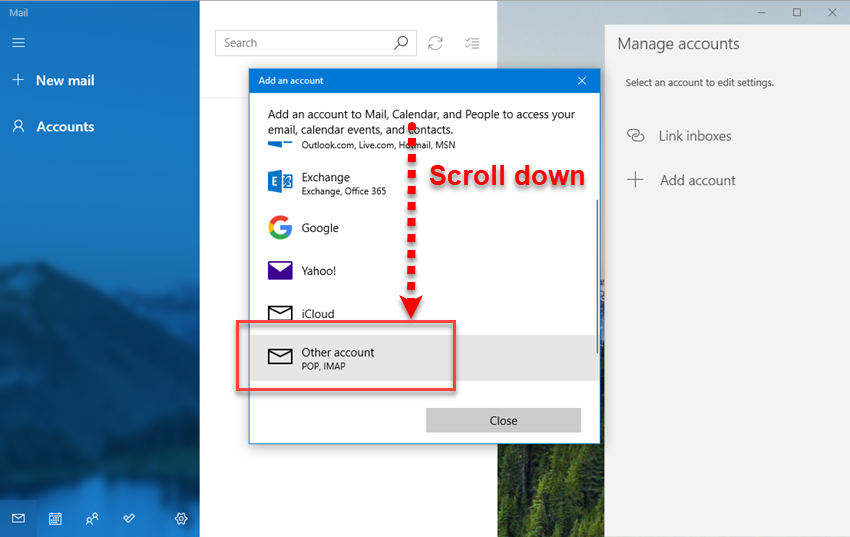
3) Once the 'Add an account' box pops up you will need to scroll down until you see "Other account - POP, IMAP" and then click on "Other account - POP, IMAP".
4) NOTE: This step requires your domain names DNS to have an "autodiscover" CNAME record to work correctly. If your domain name is registered at KartHost we will have already set this up for you. If your domain name is with another Domain Name Register you will be required to add the "autodiscover" CNAME to DNS. See: KloudEmail DNS Settings Page for more details.
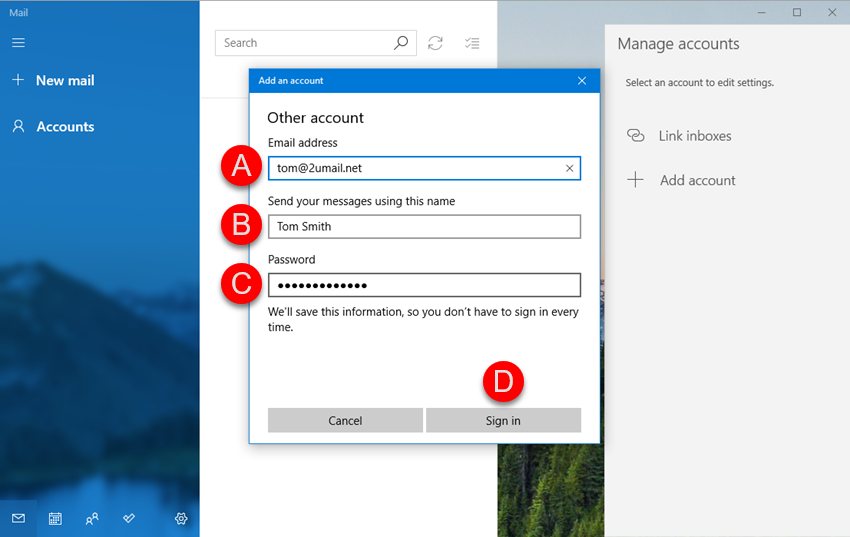
A) Type your full email address in the Email address field (all lower caps)
B) In the "Send your messages using this name" is what others receiving your email will see in the FROM column. You can always change it later.
C) "Password" field is the password to your KloudEmail mailbox you are setting up. If you do not know it you might have to reset it.
D) Once all fields are filled in, click the "Sign in" button.
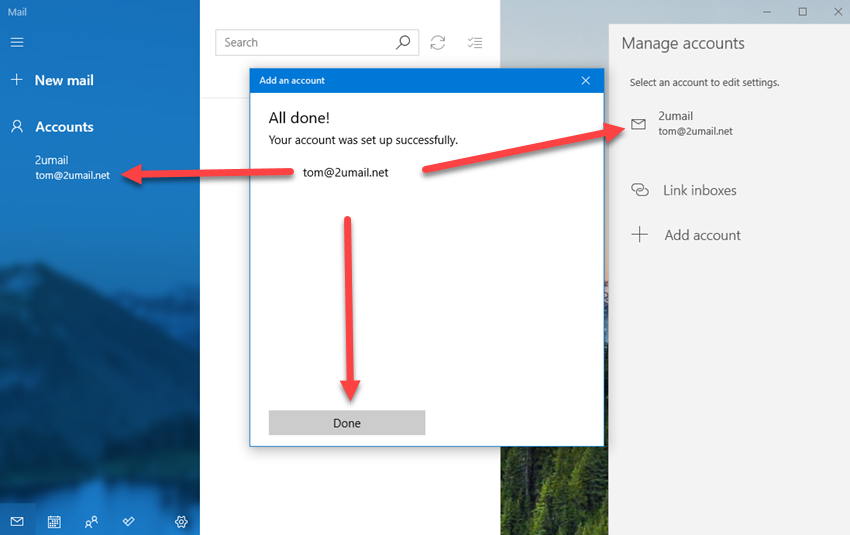
5) After a few moments you will see the "All done!" and your email account will show up in the left area and to close the 'Add an account' popup click "Done" button.
NOTE: It can take up to 20 to 30 minutes before your email starts to sync and if you have a lot of emails, it could take several hours (or a day) before all your email syncs.
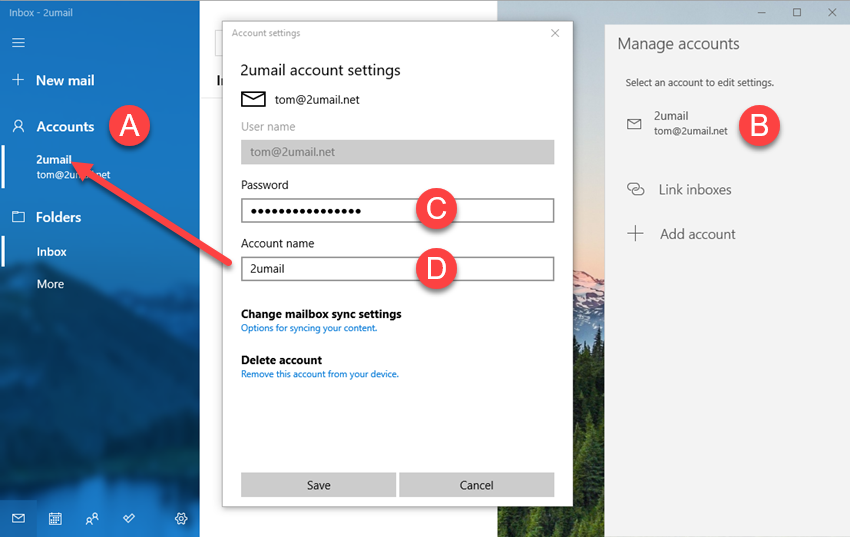
6) After your KloudEmail Mailbox is set up. You might wish to adjust your settings instead of using Mail's default settings. Here is how to do this.
A) Click "Accounts"
B) Your emails accounts will show on the gray area on the right. If you have more than 1 email account set up in Mail click the one you wish to work with.
C) Should you need to change your email mailbox password this is where you will change it.
D) "Account name" is what identifies your account, as the arrow points out what is showing here will show up above your email address. Type in anything you would like here.
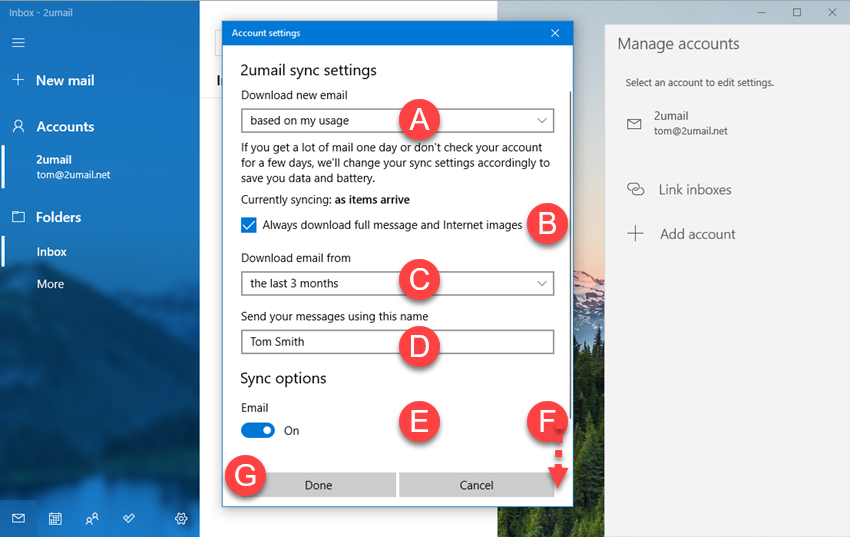
7) Clicking the "Options for syncing your content." right below Change mailbox sync settings will open the "sync settings" page for your email account. These are the defaults set by Mail, you might wish to change them here.
A) "Download new email" if left as is Mail will auto set based on your usage. On a laptop, you might wish to leave it set to this, but on a Desktop computer you might want to select:
as items arrive (recommend on a Desktop computer)
every 15 minutes
every 30 minutes
hourly
every 2 hours
manually
B) "Always download full message and Internet images" recommend you leave checked, unless you have a very limited data plan with your internet service.
C) Remember you are syncing your email with KloudEmail Webmail which is actually on the KloudEmail email server. So you can select how many emails you want to download as far as going back in time.
Your choices are:
the last 7 days
the last 2 weeks
the last month
the last 3 months (default)
any time (meaning all emails in Webmail, will show here) Recommended if you have no limitations. Note: If you do not see any emails in your mailbox after several minutes, you will need to select this setting.
D) "Send your messages using this name" This is how those that receive your emails will see your FROM field. Type in how you want that to appear to them.
E) Under Sync Options you will see a toggle switch labeled "Email" It defaults to "On" by switching it to off will stop all email Syncing to Mail for this email account.
F) The "Advanced mailbox settings" text right below Sync On toggle (not shown must scroll down) is "Incoming and outgoing mail server info" If you click the blue link that area will expand and you will need to scroll down to see all of it. But these are the required settings so your email account in the Mail email manager can communicate with the KloudEmail email server. Do NOT change any of these unless you know what you are doing.
NOTE: SSL = Secure Socket Layers meaning the connect between Mail and the KloudEmail email server all data is encrypted. So your communication remains private. However, remember once you send an email to someone and that email leaves the KloudEmail system it is no longer encrypted. So make sure to NEVER place delicate information in an email like SSN numbers, credit card numbers etc.
G) Remember after making changes to click the "Done" button and then "Save" button to save all changes. If you didn't save you will lose all the setting changes you made. :(
END OF TUTORIAL
Learn more about KloudEmail Basic, Suite and Hosted Exchange - Your Professional Branded email service


