This Tutorial will show you how to use the Signature & Identity if using Webmail with your KartHost KloudEmail email account.
9/30/25 WARNING: Due to Spam, Phishing, and Hackers, we recommend Do NOT change your identity's email address. Only one identity allowed.
IMPORTANT TO KNOW: Signatures are NOT part of the email service. They are part of the 'email manager'. On your phone & tablet, you have an App that manages your email, on your laptop & desktop you have a choice of an Email Manager or using Webmail (a generic term for logging into your email mailbox to manage your email) as your email manager. Without an email manager, it would be very difficult to read, send, and manage your email with raw code. Below we will discuss using the KloudEmail Webmail.
To accomplish this task you first must be logged into your KloudEmail Webmail email account. If you need instructions read this KartHost Knowledgebase article "How Do I Login to KloudEmail Basic & Suite & OWA Webmail Panel? Webmail Panel?"
Note: Signatures & Identities set up in Webmail are only used when you send emails using Webmail. If you are planning on using other devices like your smartphone, tablets of any kind, and email managers like Microsoft Office Outlook, Thunderbird, Mac Mail, or any other email manager you MUST set up your signatures in those devices.
Step 1) Click on the
(A) "hamburger menu" on the far right next to your email address and then
(B) Click on 'Settings'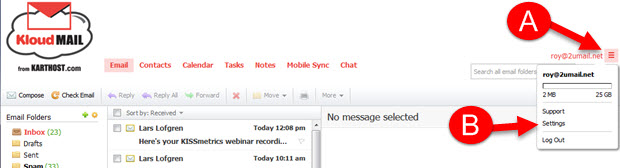
Step 2) Once the Settings popup palette opens click on "Composing Email" on the left navigation.
Step 3) Click the Signatures tab to add an additional Signature
Step 4) Now click on the
(A) Add New Signature button, the Add New Signature window will open.
(B) Give your Signature a name that you will recognize,
(C) Then format your signature in the Edit Signature box.
(D) When done, click on the "OK" button.
NOTE: The Disable Formatting Link (shown in the image below) will show "Enable Formatting" the first time you login. If Enable Formatting is showing you will only have plain text formatting, no HTML formating (no links, text size, color, etc). If you wish to enable HTML formating and activate the associated editing toolbar click the "Enable Formatting" link so that it will change to "Disable Formatting".

Step 5) This is important, you MUST Save to keep from losing your changes. When you do click the Save button this will close the Settings window, you MUST then reopen the Settings window. Once the "Settings" window is open move on to the next step.
Step 6) Now open up the Settings window again, click on
(A) Composing Email, and then the
(B) Identities tab. Now click the
(C) Add New Identity button, to add a new identity. EDIT button to add a new signature or change your name. Do NOT change the email address.
9/30/2025 Identities are being sunset, and adding new identities is no longer available.
Step 7) With the Add New Identity window open fill in the fields
(A) Full Name This is the From Name that will show up in emails you send
(B) This is the email address that will be shown to the recipient. DO NOT change to another address unless you want your emails to be flagged as spam.
(C) Reply To - When the recipient replies and you want them the reply to another email address, place that email address here. (only if you want a different email address) If left blank they will reply back to your main Email Address DO NOT send to another address unless you want your emails to be flagged as spam.
The ability to have more than one Signature is still available:
(D) Default Signature This is the Default Signature that will be used when you use this Identity. (You MUST have already set up your Signature)
(E) Once all set make sure to click the "OK" button and the Edit Identity window will close and your settings saved.
Step 8) Click Save on the Settings Window to make sure everything is saved. If you do not Save, then the changes never took place.
Step 9) Now open the Settings Window again so that you may select the (Default) Identity that you wish to use. Just highlight the Identity in which you wish to be the default identity and then click Set to Default.
Now click the "Save" button once again to save your settings and close the Settings window.
NOTE: After the Settings window is closed and you refresh your web browser (you can do this by pressing down on the "ctrl" key + "F5" key on your keyboard at the same time (Mac users press "Command Key" + "F5" at the same time). Your web browser will refresh and notice the change where your email address that was next to the "hamburger" menu is now changed to the same Identity Full Name you gave to the Default Identity (as seen below).
Step 10) Let's test your changes
A) by clicking on Compose on the toolbar.
B) Once the New Message window opens you will now notice you have a From drop menu that you did not have before (because you have more than one Identity). If you wish to use another Identity other than the Default Identity select from the drop-down menu.
C) In most web browsers the Signature will change, other browsers may not auto change the signature, you will have to manually select the signature at the bottom of the page.
(NOTE: at the time of this writing, we recommend using Google Chrome browser both with PC and Mac computers).

updated January 24, 2022
END OF TUTORIAL


