You have an existing mailbox set up and you would like to forward all incoming emails to another email account. You can do this in your KartHost KloudEmail Webmail.
(For more options see Forwarding Emails using KloudEmail Control Panel)
We will assume you have already logged into your Webmail email account. If you do not know how to do this view this KartHostKloud Mail Knowledgebase Article: How Do I Login to KloudEmail Webmail Panel?
1) Once in your KartHostKloud Professional Mail email account look to the right and see your email address or name and to the next of it you will see three horizontal lines stacked above each other (the "A" red arrow is pointing to it) which we will call a "Hamburger Menu". Click on the Hamburger menu and a drop-down menu will appear, click on "Settings" on the drop-down menu (the "B" red arrow is pointing to "Settings").
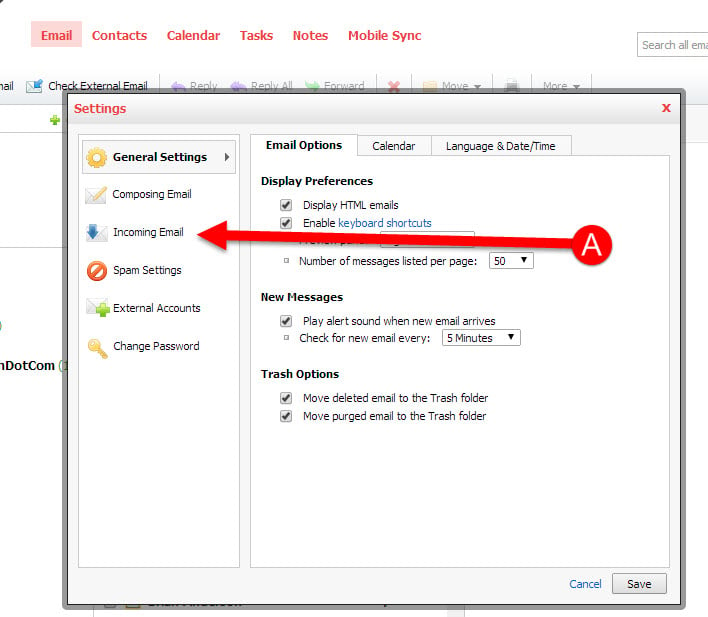
2) The "Settings" control panel will pop up in your web browser as seen in the image below. Then on the left menu in the Settings control panel click on Incoming Email as shown by the "A" red arrow.
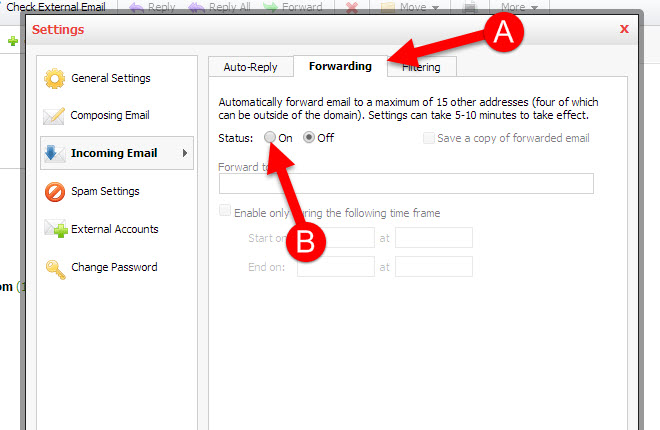
3) Then click the Forwarding tab at top of the Settings control panel as seen by "A" arrow and then you will see the forwarding status, and if you are turning it on it will be "ticked" Off. If you wish to enable forwarding you will tick it On.
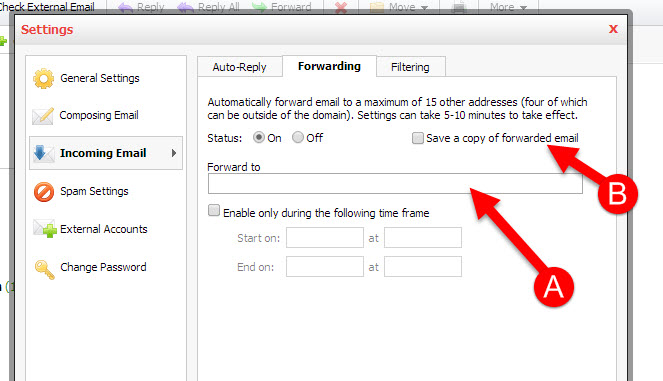
4) Now you will place the email address where you would like to forward your email in the "Forward To:" field, as shown with "A" red arrow. If you wish to keep a copy of your forwarded email in your mailbox make sure to tick the check box "Save a copy of frowarded email" as shown by "B" red arrow.
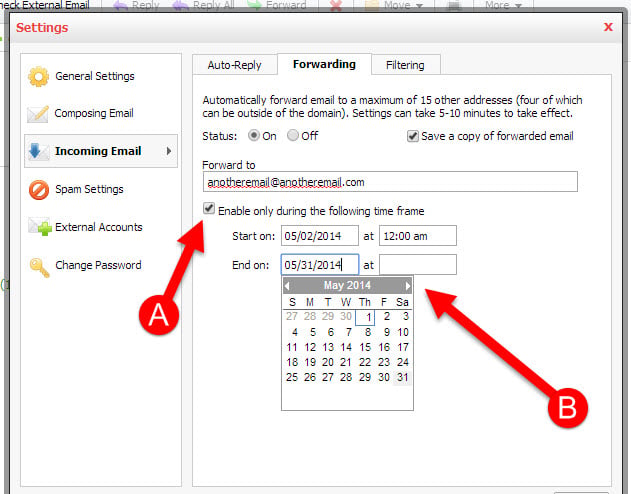
5) Now if you wish to only forward your emails for a certain time period tick the check box "Enable only during the following time frame" as shown by "A" red arrow. And then select the date and time in the Start on and End on fields below. Shown by "B" red arrow. This will automatically allow forwarding during a specific time only and you will not have to remember to disable.
MAKE SURE TO CLICK THE SAVE Button at the bottom of the Settings control panel when you have made your settings selection.
END OF TUTORIAL
Most Popular Articles
An Outside Email is Unable to Send Emails to Me - Adding to Safelist
Are you using the KartHost KloudEmail system? If you are and you are having an issue of someone...
MD5 Challenge-Response changing to Password Authentication - Mac
Any Email Manager you are using should be using the Password Authentication Method for sending...
Getting Outlook Popup wanting my Username & Password after successful set up
If you are getting this Outlook pop up after completing and using your Outlook email address?Well...
Using Google Chrome - "The pages have become unresponsive. Wait or Kill" message.
NOTE: This tutorial is here to help you resolve this specific problem for KartHost KloudEmailTM...
How Do I Change My KloudEmail Basic or Suite Mailbox Account Password using Webmail?
Updated - Feb 5, 2019 IMPORTANT - If you change your MailBox Password Remember you will be...


