How to Manage Multiple KartHost Customer Center Accounts with One Login.
User - If you need a person on your team to login to your KartHost Customer Center account to help manage any part of your account for any reason, you need to send an Invite to that person's email of choice to set up a User to access your account.
Contact - If you wish to have certain members on your team NOT HAVE LOGIN capability but receive certain emails (like Invoices, Support Tickets, etc.) from your KartHost Customer Center Account, you need to manually set them up as a Contact in your Customer Center Account. Please visit this Tutorial: Contact - Adding and Managing a Customer Center Contact
Existing User - To invite a person who is an existing KartHost Customer Center customer, use the email address they use to log in to their account. That is their user ID.
Let's get started setting up a 'User' to have access to your Account...
NOTE: To see the instructions for accepting an invite, see this KartHost Tutorial Article: Accepting a KartHost Invite from Account Owner
First - You will need to be logged into your KartHost Customer Center Account to accomplish the following. You would normally do this by going to KartHost.com then click on "All Logins" and then on the All Logins page click Customer Center. For your convenience here is the direct login: Login to KartHost Customer Center
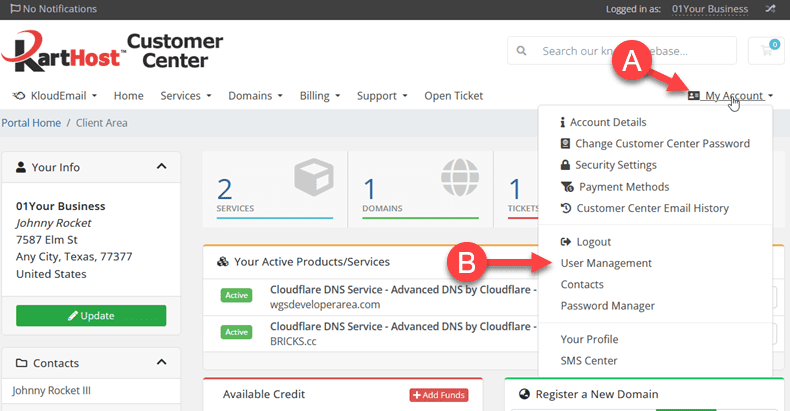
STEP 01 - (A) on the horizontal navigation bar, far right, click My Account. (B) From the drop-down menu select User Management (note the location of User Management could be different than shown in the image below).
STEP 02 - On the resulting User Management page, below the 'Invite New User' section (A) type in the email address of the person you wish to send the invitation to. (B) The default will be 'All Permissions' on your account, however, (C) if you wish to limit the Permissions on the account tick "Choose Permissions and the resulting permissions will appear. Check all Permissions you wish this Invite to have on your account. (D) Once all set click the Email Invite button.

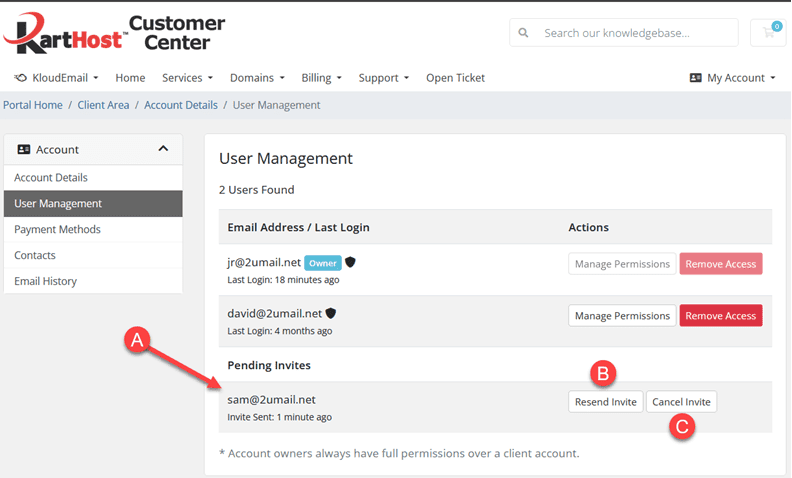
STEP 03 - (A) You will now see the email address of the person you invited. And it will show how long ago you sent the invite. This will also confirm the person hasn't accepted the invite as of yet. (B) If you need to resend the Invite Email click the "Resend Invite" button. (C) Optionally if you wish you can cancel the invite by clicking the "Cancel Invite" button.
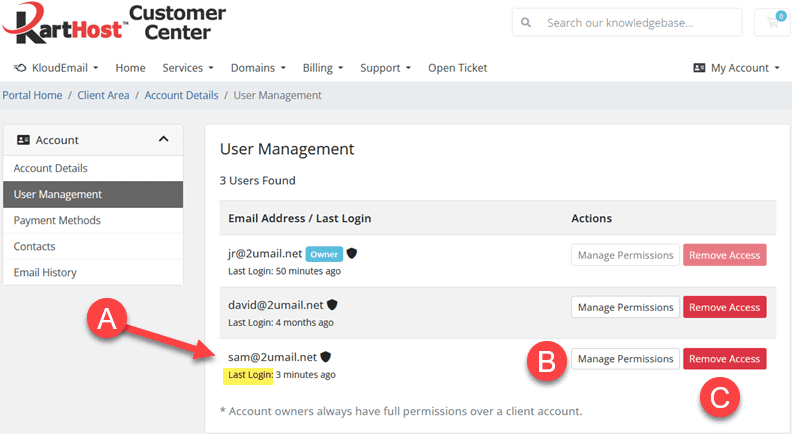
STEP 04 - After acceptance of the Invite. (A) The "Invite Sent:" will change to "Last Login:" after a successful Invite.
(B) You will now see the "Manage Permissions" button that will allow you to change your User's permissions on your account.
(C) The "Remove Access" button will totally remove this User from your account and they will no longer have access.
NOTE: To see the instructions for Accepting an Invite, see this KartHost Tutorial Article: Accepting a KartHost Invite from Account Owner
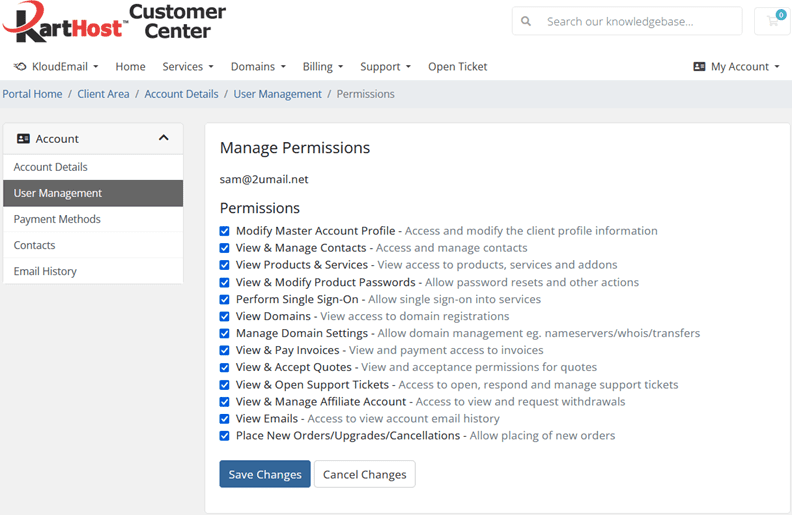
STEP 05 - Managing a User - After selecting the User by selecting Manage Permissions, simply check or uncheck the box next to the permissions which you wish this User to have. This can be adjusted at any time.
END OF TUTORIAL
last update: September 18, 2022


