If you have the KartHost KloudEmail service you can set up an unlimited number of Group Lists. These lists are a very good way to manage your users in a select team or specific group on your domain name. You can mail to all your users on your domain and up to 250 additional recipients outside of your internal domain.
An example of use, let's say, Tim, Nick, and Carol are on a committee together. You can create a Group List for this committee and they can communicate updates among the committee at a special email address, say comittee@yourbusiness.com.
And let's say Edward who is a consultant is outside your company needs to be on the discussion and is outside your domain name, you can add his outside email address. There are many scenarios for using Group Lists.
Here is how to use and set up Group Lists in the KloudEmail Control Panel (Group Lists cannot be set up in the KartHost Customer Center Manage Product page).
1) Login to your KloudEmail Control Panel (your login credentials will be in your Password Manager in your KartHost Customer Center under Product Passwords).
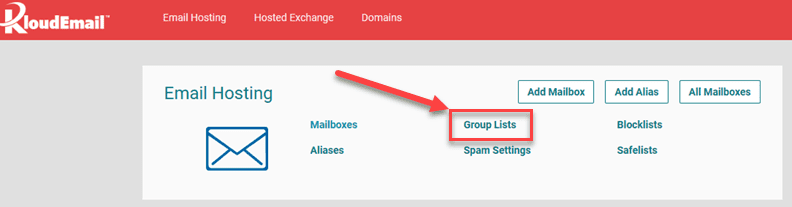
Once you are logged in, just click on Group Lists in the Email Hosting block.
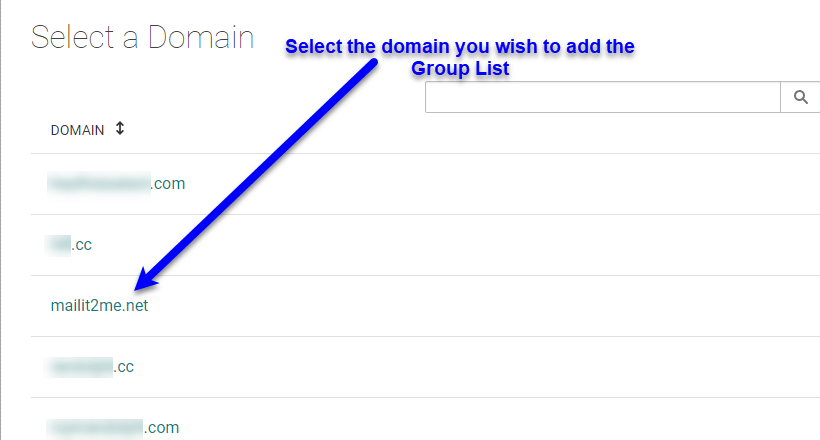
2) If you have more than one domain name associated with your KartHost KloudEmail account, click on the domain name to which you wish to add the Group List.
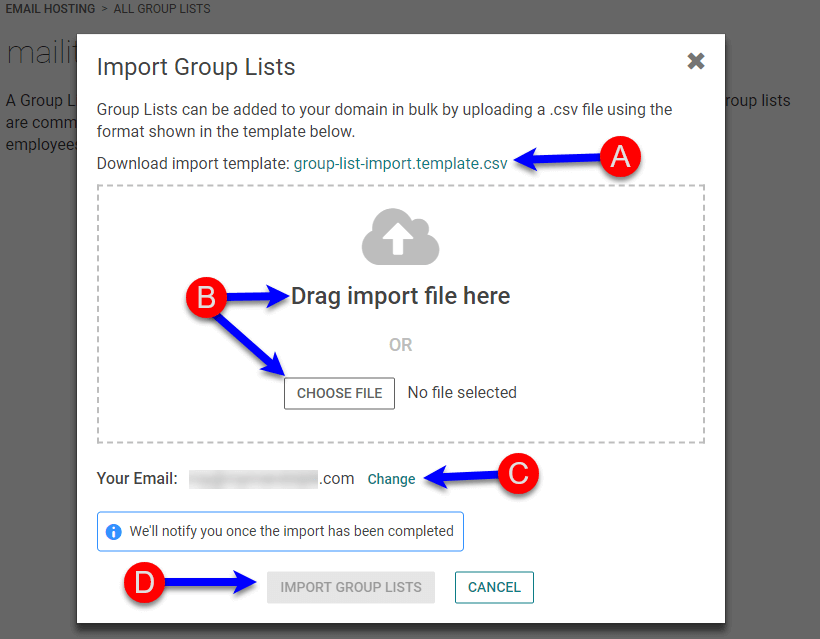
3) There are two ways to set add a group list, either manually or via a prepared .csv file. If you have a larger number of email addresses you can set up a CSV and just import. Click the button "IMPORT GROUP LISTS".
3 IMPORT) Once You Do, a lightbox (popup) will appear and to obtain the properly formatted CSV file
A) click the link "group-list-import.template.csv" and it will download, and open your spreadsheet program (APP) and add your email addresses to the spreadsheet. Then SAVE your spreadsheet making sure to save as a CSV file and then
B) upload by either dragging and dropping or selecting the file off your computer/device.
C) Make sure the email address that is showing is the email address you wish to have the notification email announcing the import is completed to be sent. If not, click the Change link to change the email address.
D) Then finally click the IMPORT GROUP LISTS button.
3 MANUALLY ADD) To manually add your email address, just click the "ADD GROUP LIST" button instead and you will be taken to a 3 Step Process page and we will go over all three steps. (Note all this information will be asked in the CSV template if you decide to do a CSV Import instead).
Step 1 - GROUP LIST INFORMATION -
A) Display Name field (required) you will give your list a unique name, in our example, we will call it New Hire Committee.
B) Email Address (required) is needed for sending to the list. This email address must be unique meaning another mailbox or email Alias can not have the same username.
C) Subject Prefix (optional), whatever you place here will proceed your email subject. So let's say your Prefix is Hiring Committee, and you send an email with a subject of "New Hire Class Start Date" in the subject line you will see "[Hiring Comittee] New Hire Class Start Date"
D) You will need to select either Announcement List (once you send the email all reply's to it will come back to the person who originally sent the email OR
E) Group Discussion, regardless who sends the original email, all replies will go to the entire list, making it a true discussion group.

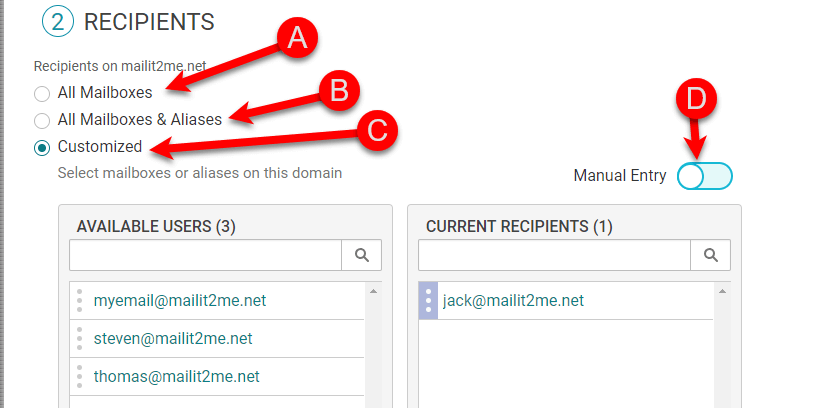
Step 2 - RECIPIENTS - This is how you will determine who will be on this specific Group list. There are several options and we will go over and explain each.
A) All Mailboxes - You are basically sending to ALL MAILBOXES on this domain. Plus any Recipients outside of your domain name you list.
B) All Mailboxes & Aliases - You will send to ALL EMAIL ADDRESSES (Mailboxes and email aliases) associated with this domain PLUS all Recipients outside of your domain name you list.
C) Customized (the choice most people use the most) - You can manually select all Available Users listed in the user's column select and drag to the Current Recipients column. as well as add Recipients outside of the domain name. OR
D) Click the Manual Entry and you manually type in the mailboxes or aliases to be sent to on this domain, PLUS add Recipients outside of the domain name.
Step 3 - AUTHORIZED SENDERS - This setting will authorize who can send to this special Group List.
A) Unrestricted — By selecting this setting (not recommended), anyone can send to this list from any email address inside or outside of the domain name. This makes the list an OPEN list. It is also subject to spamming, so use it carefully.
B) Domain Only - Anyone with an email address on this domain name can send to this Group List.
C) Group Only — You can send to this list only recipients you previously listed in Step 2 in Recipients.
D) Customized - Only Select mailboxes or aliases on this domain can be sent to this list. Of course, setting the "Manual Entry" toggle to ON will allow you to type in the email addresses manually.
NOTE: In the Senders outside of yourdomain.com box at the bottom (not shown) you can allow anyone to send to the list, listed in that box up to a maximum of 250 email addresses.
4) Maximum Email Attachment size—Note that while you can send up to 50MB attachments through normal KloudEmail (Basic, Suite, or Hosted Exchange), the maximum when sending to a Group List is 5 MB, so be aware!

5) Once you have your Group List set up the way you want it, click the CREATE GROUPLIST button (not shown), and your Group List will be created.
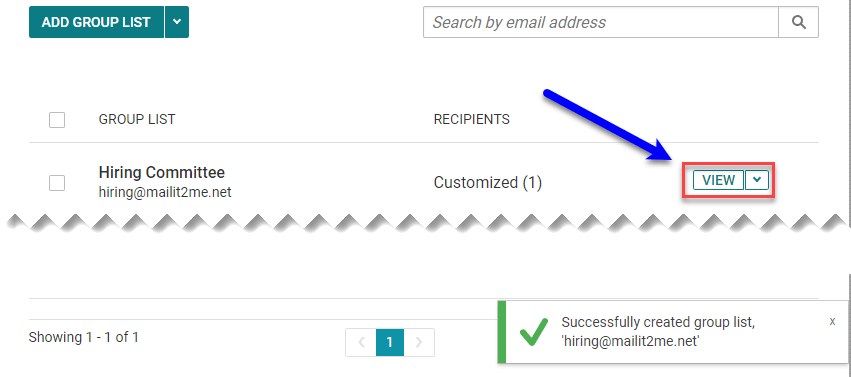
The image below shows the results of a successful Group Creation. Once the Group List is created, if you wish to make changes to it, simply click the VIEW button to manage that specific group email.
END OF TUTORIAL


